01 Feb
Content marketing has become one of the best (and most cost-effective) ways to get traffic to a website. When done right, the traffic keeps coming long after you stop actively promoting it.
If you own an e-commerce website and want to learn how to utilize blogging to grow your brand and increase your sales, this is the guide for you.
I’ve personally grown blogs to over 250,000 monthly visitors, and I’ve worked with dozens of clients in the e-commerce space to help them do the same. Here’s an overview of my seven-step process to starting and growing an e-commerce blog.
But first…
Creating a blog has a whole host of benefits for e-commerce websites:
- It can help you move visitors along your marketing funnel so they eventually buy.
- You’re able to rank highly for keywords on Google that your product pages could never rank for but that are still important for building brand awareness and finding customers.
- It can help you grow your email list.
- You’re able to continue to get traffic without constantly spending money on ads.
- It provides many opportunities to link to your product and category pages to help them rank better on the SERPs.
If you don’t know what some of these things mean, don’t worry—I’ll explain them along the way. But for now, let’s take a look at some e-commerce blogs that are working well right now so you can see the end goal.
Examples of successful e-commerce blogs
Three of my favorite examples of e-commerce websites using blogging are:
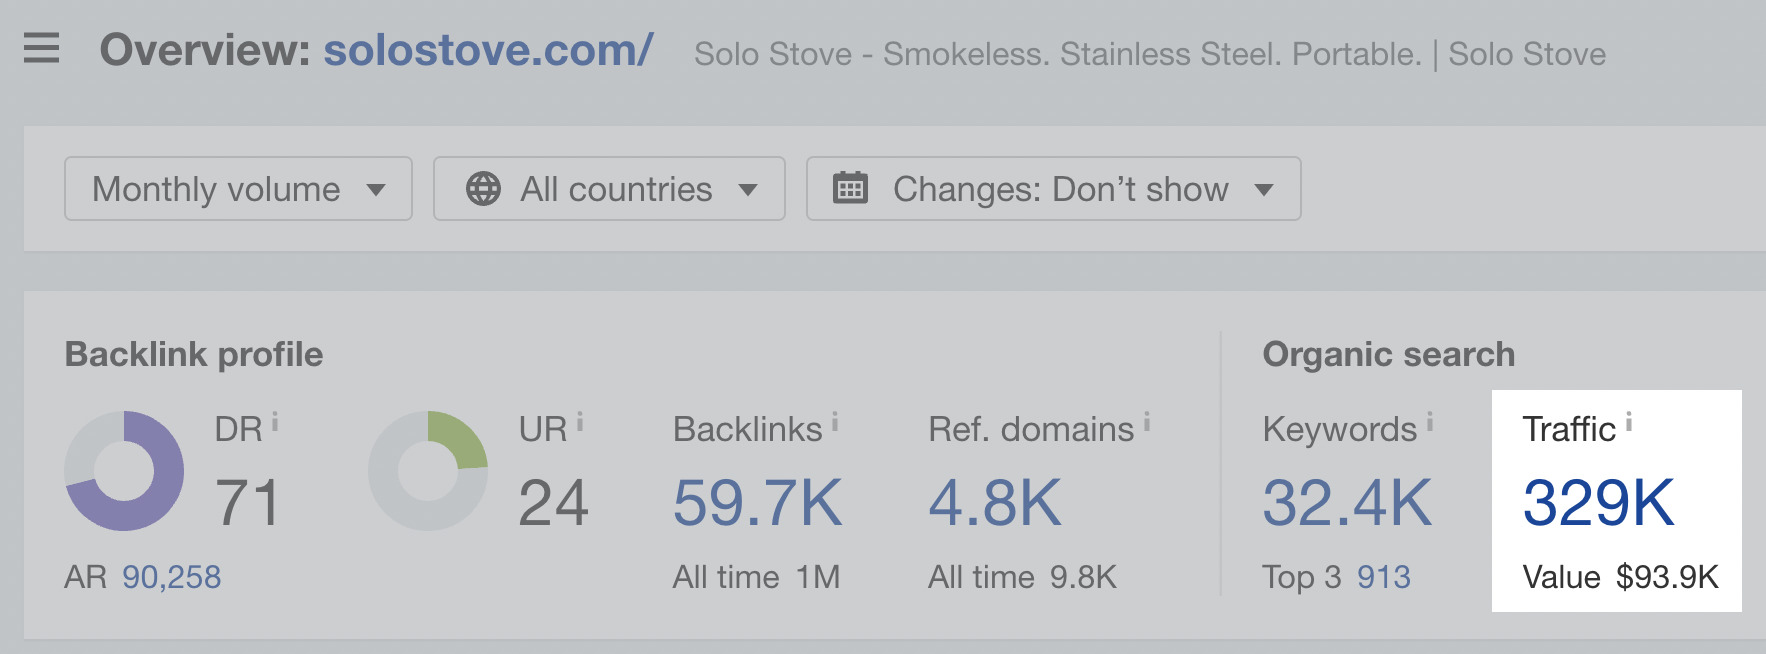
Solo Stove comes in at the top of my list due to its excellent use of videos, photos, and helpful information on the blog. It also does search engine optimization (SEO) really well, bringing in an estimated 329,000 monthly visits from Google (data from Ahrefs’ Site Explorer).
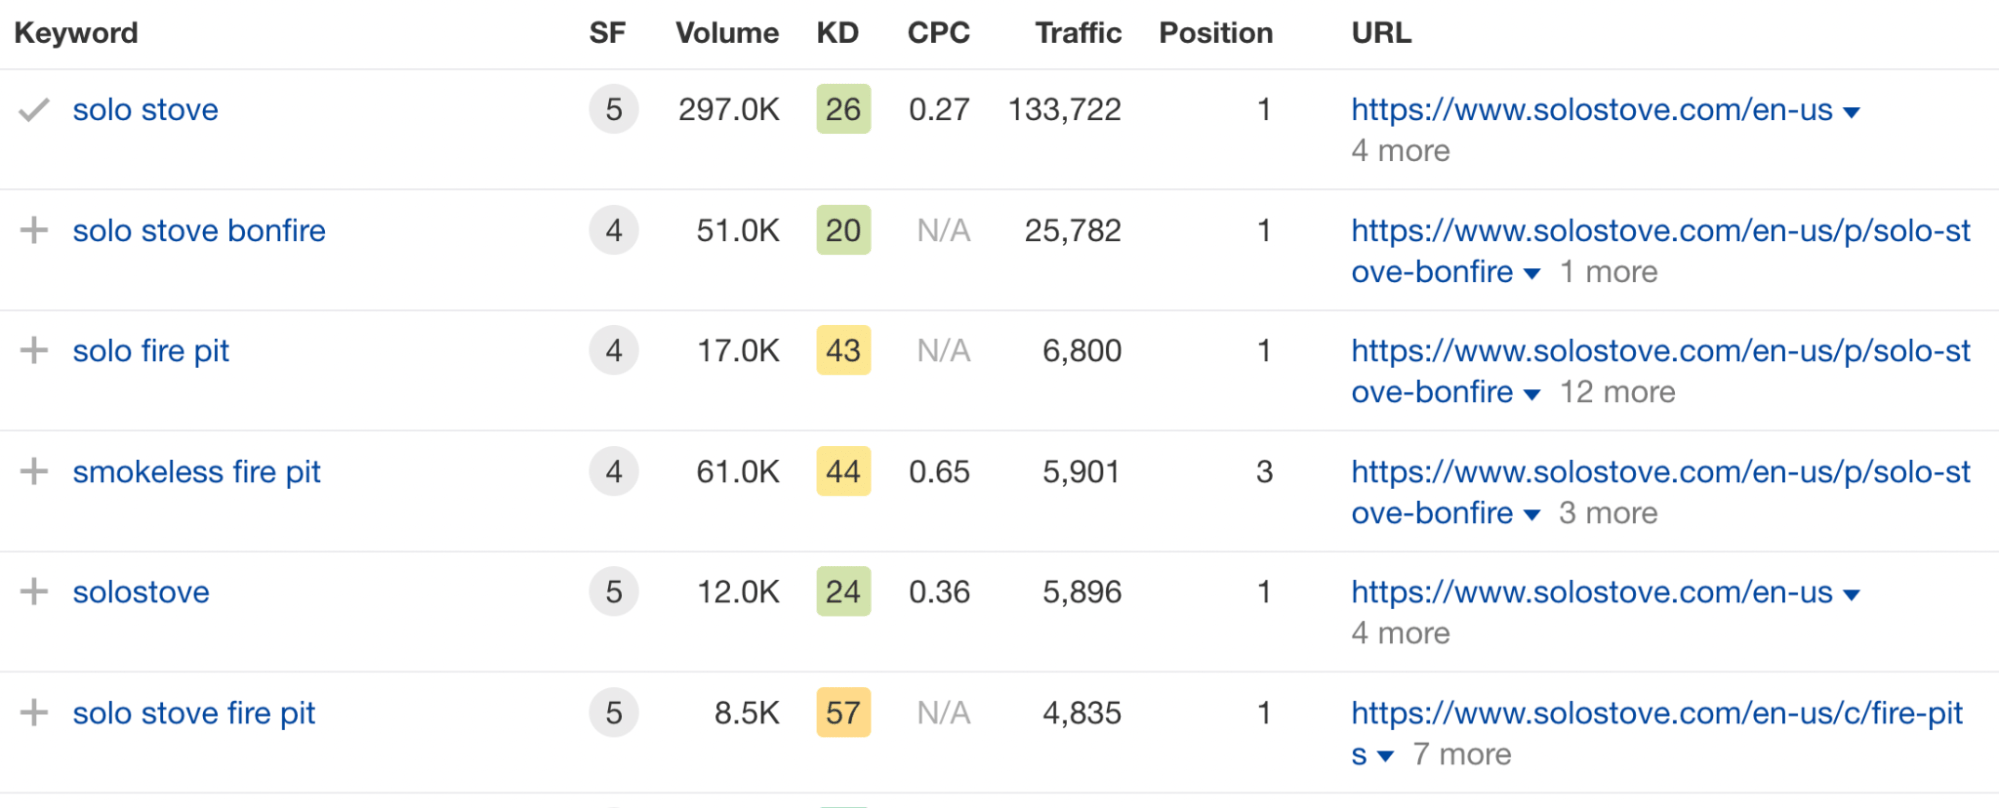
In fact, it’s grown its brand to such a level of popularity that it even created search demand for keywords that include its brand name in them, then created blog posts to rank for those keywords:
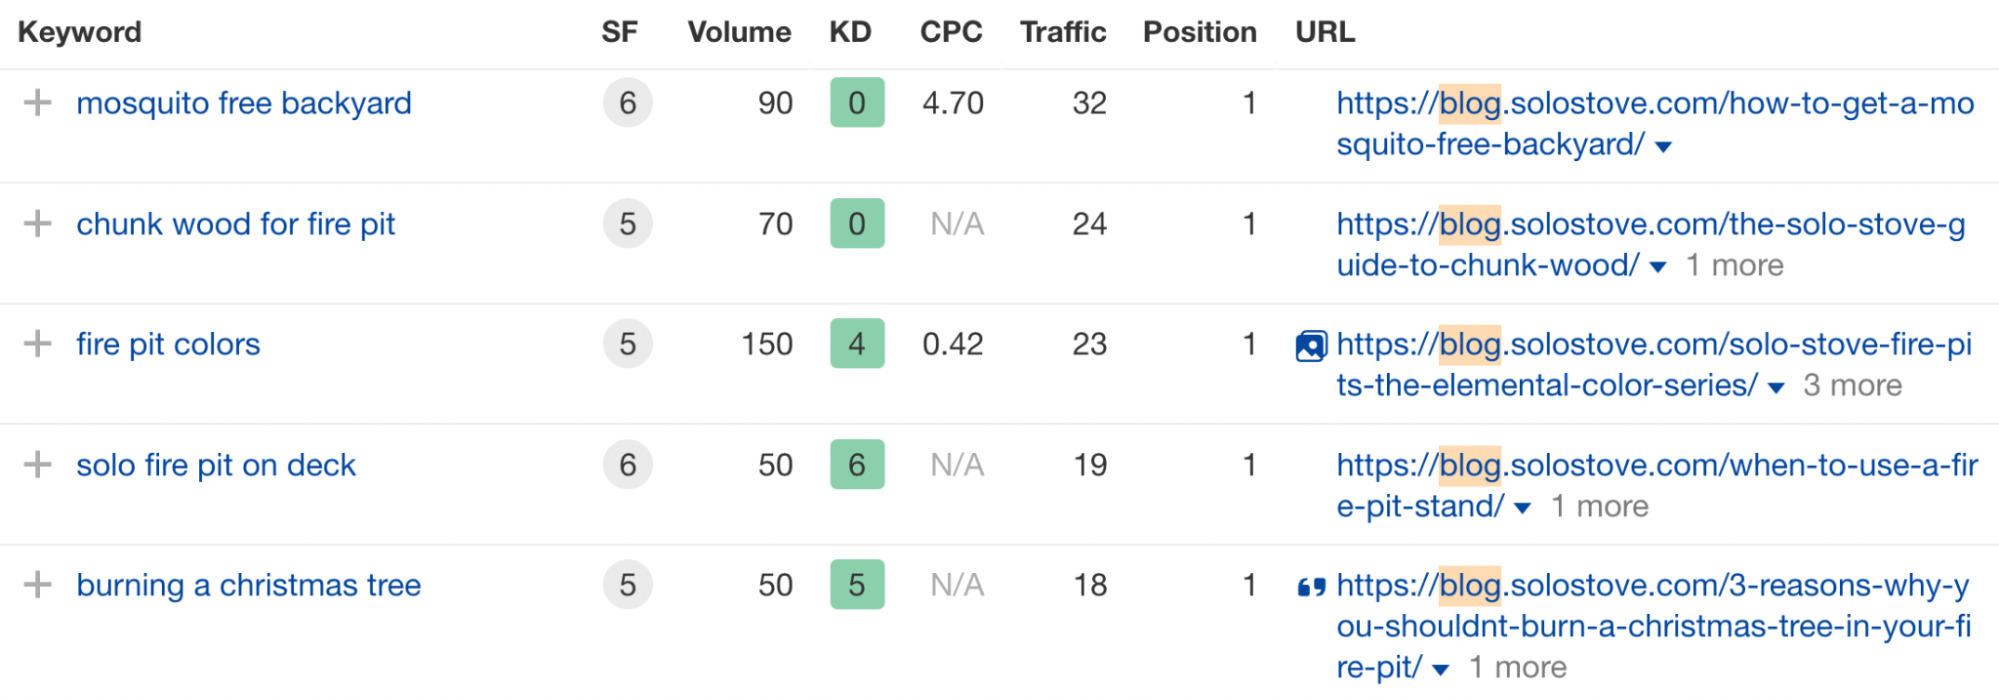
But that’s not all it did. Its blog posts also rank for other keywords in its marketing funnel, such as how to have a mosquito-free backyard or how to change your fire pit’s colors.
Then on its blog posts, it uses pictures of its fire pit:

Ranking for these keywords does two things:
- It introduces Solo Stove’s brand to people who may eventually purchase a fire pit from it.
- It gives the brand the opportunity to promote its products to an audience who may not have even known it existed, such as the “mosquito free backyard” keyword.
Moving on, skater brand Flatspot also does blogging well, with a cool ~80,000 monthly visitors to its blog just from search engines.
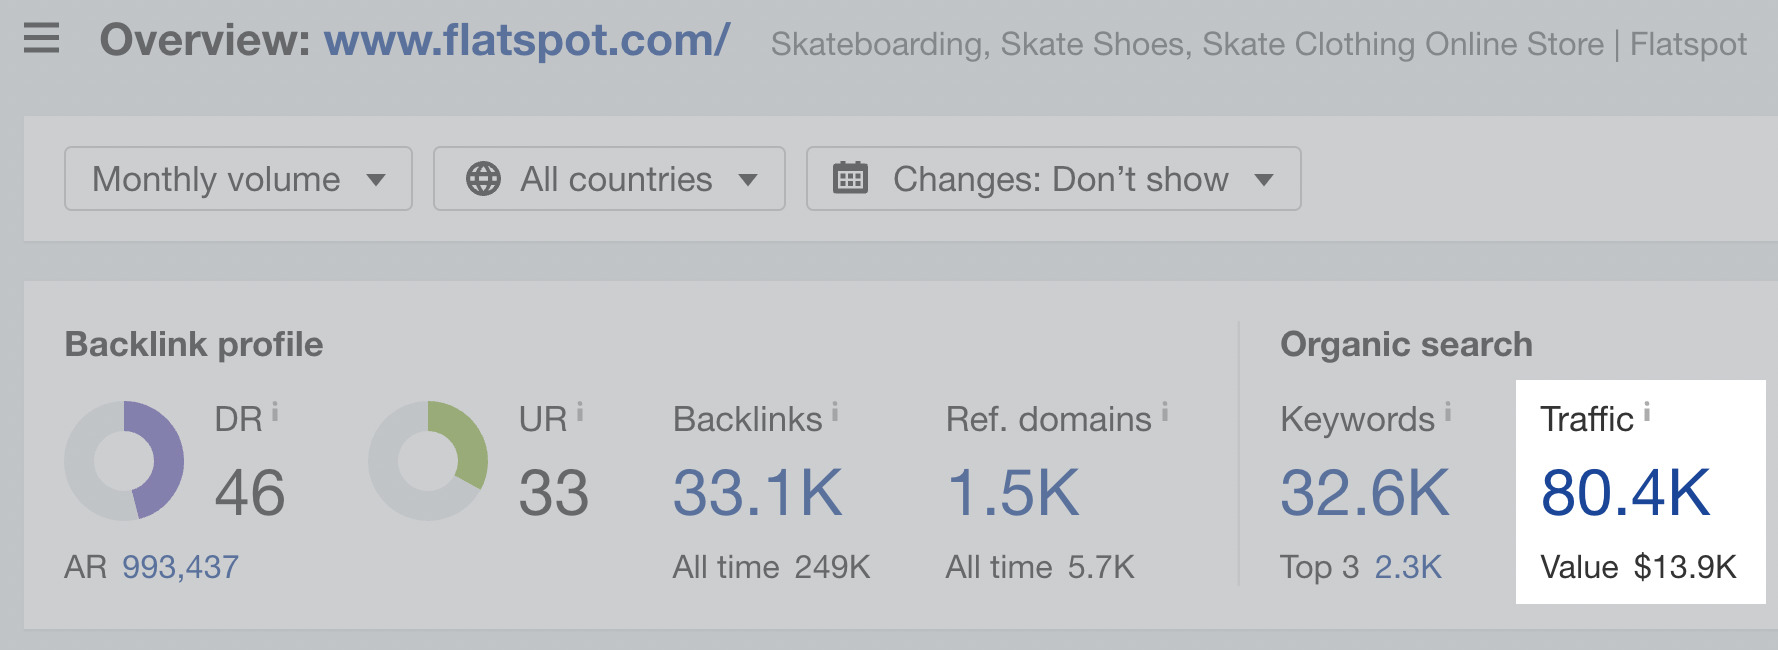
One of its tactics is to piggie-back on the popularity of new shoe releases from major brands like Nike, then use that traffic to get readers to buy the shoes directly from it:

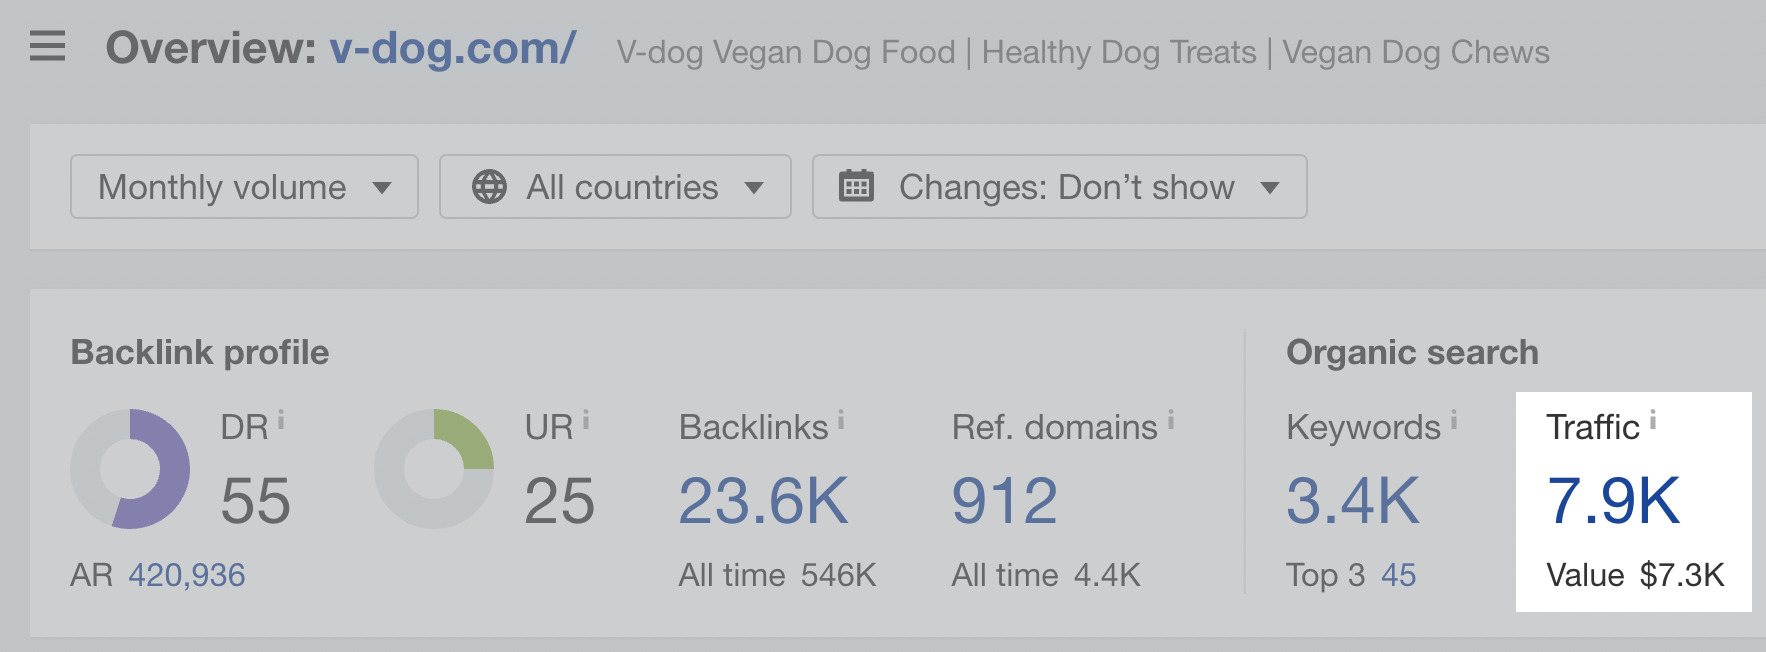
Finally, let’s look at v-dog—a plant-powered kibble manufacturer that gets ~8,000 visits per month.
My favorite post it’s done is its guide to making wet dog food at home, which ranks for the featured snippet for “how to make wet dog food”:
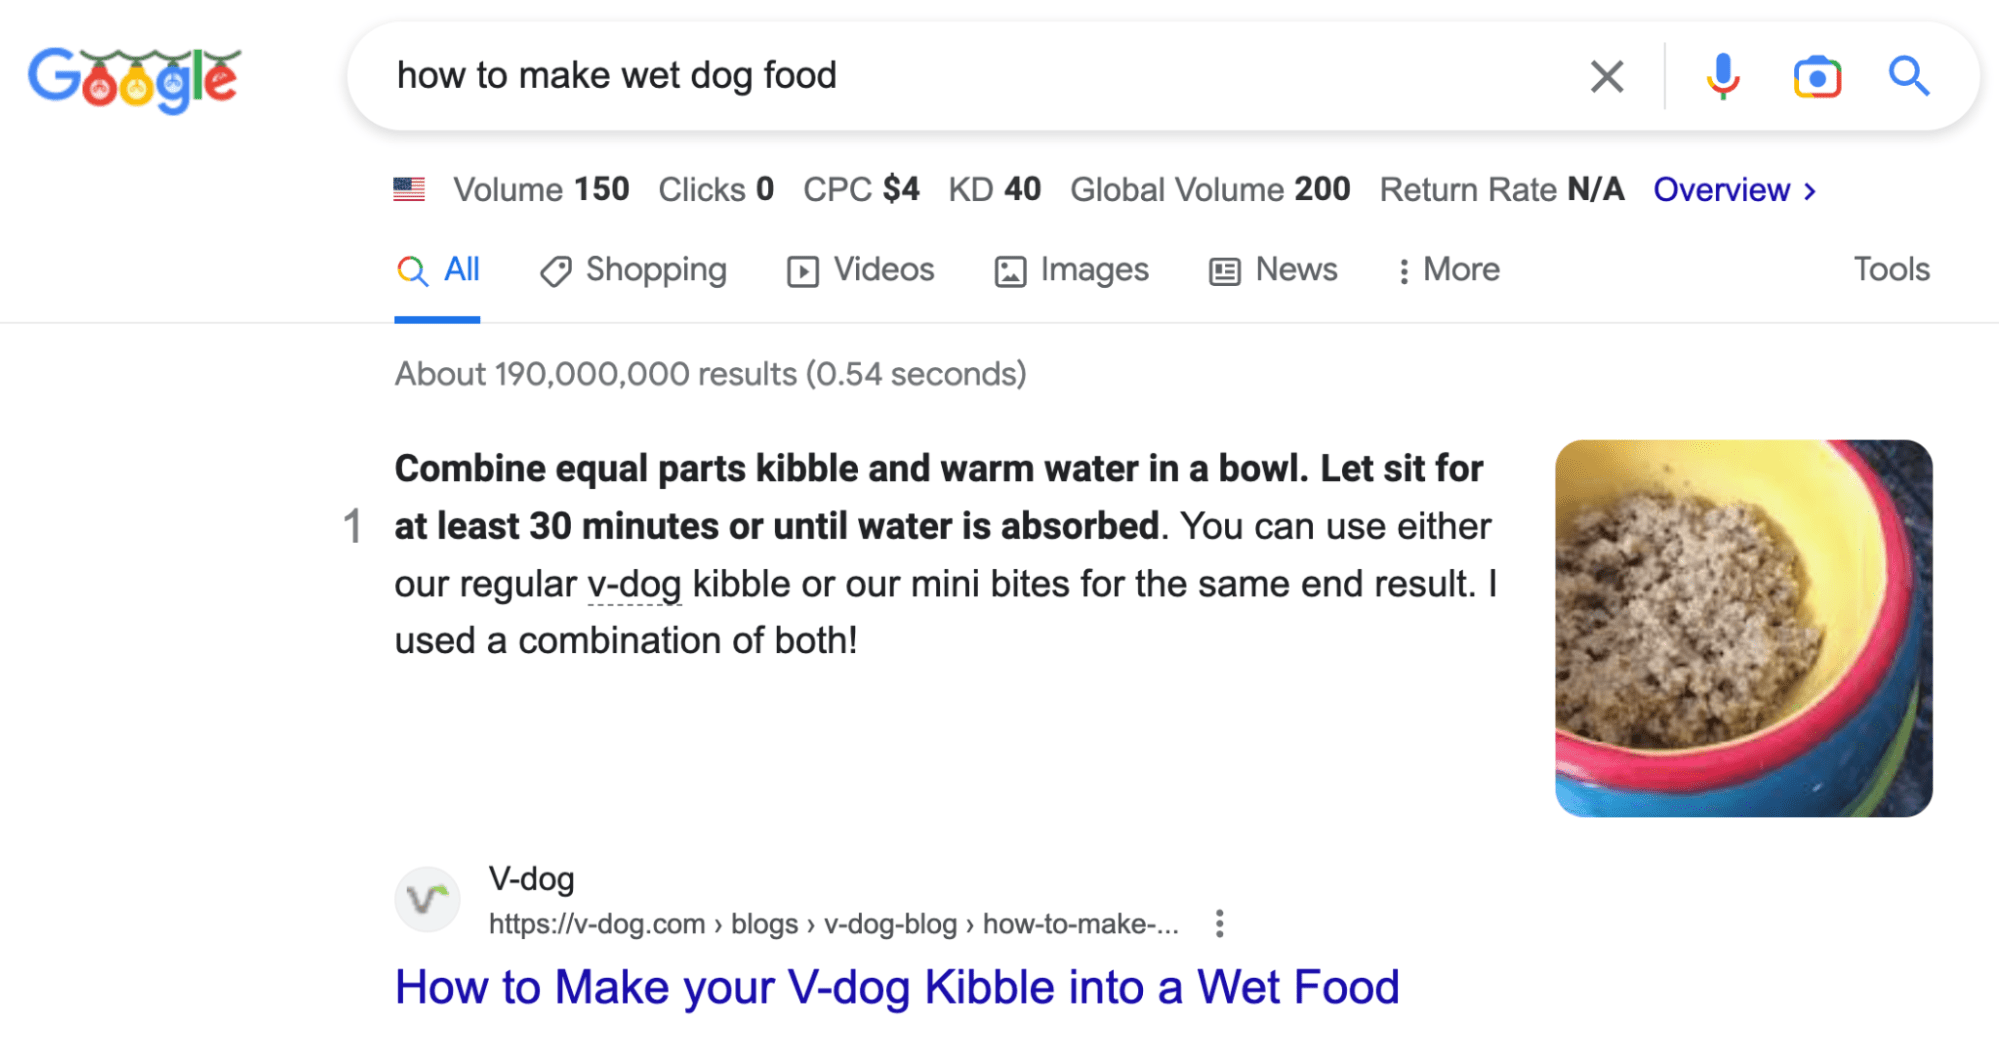
This guide directly promotes v-dog’s product to make wet dog food. So people who search the query will be introduced to its brand and potentially buy its product to make their own wet dog food at home.
And there you have it—three examples of blogging for e-commerce that’s working right now. With that, let’s talk about how you can start your own blog.
In my 10+ years as a professional SEO and freelance writer, I’ve worked with over a dozen e-commerce stores to help them grow their website traffic. I’ve also run several of my own e-commerce websites.
In that time, I’ve distilled what works into an easy-to-follow seven-step process:
1. Do some keyword research
I never start a blog without first doing keyword research. Not only does this make coming up with blog topic ideas much easier, but it also ensures that every blog post you write has a chance to show up in Google search results and bring you free, recurring traffic.
While we wrote a complete guide to keyword research, here’s a quick and dirty strategy for finding keywords fast:
First, find a competitor who has a blog. Let’s say you’re selling dog food just like v-dog—if I search for “dog food” on Google, I can see some of my competition:
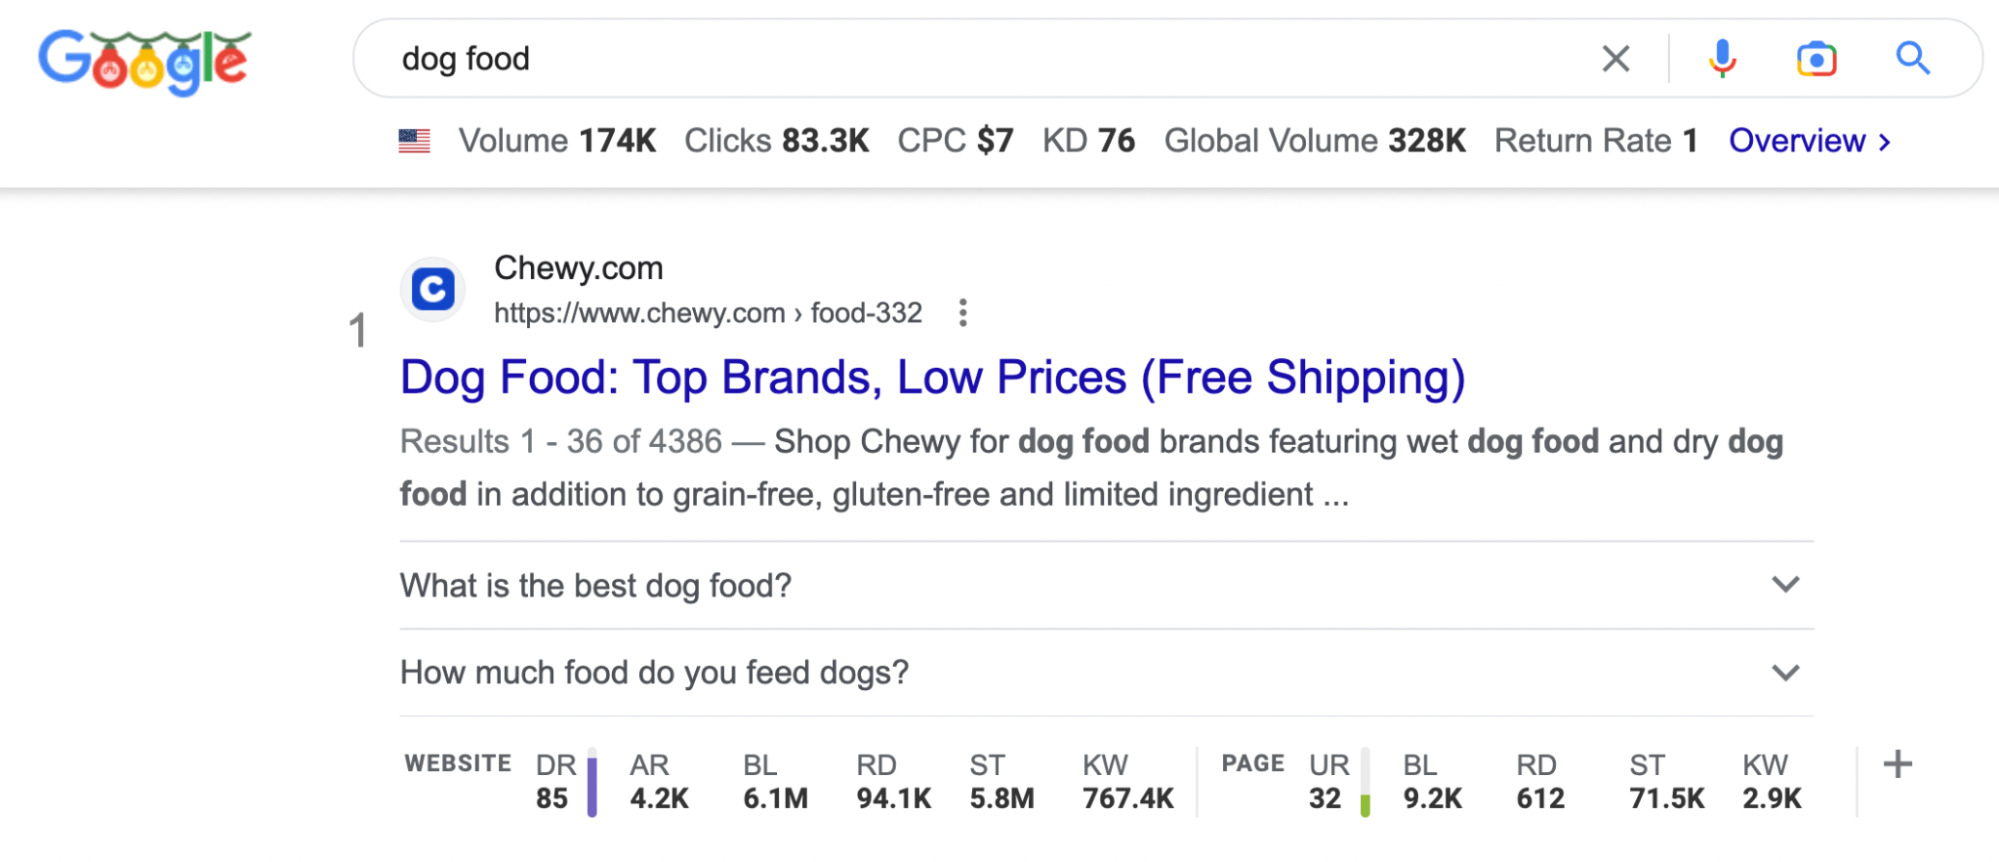
At this point, I look for relevant competitors. For example, Chewy and American Kennel Club are good competitors for research. But I’ll skip sites like Amazon and Walmart, as they are just too broad to get relevant data from.
Next, plug the competitor’s URL into Ahrefs’ Site Explorer and click on the Organic keywords report to see the keywords its website ranks for on Google:
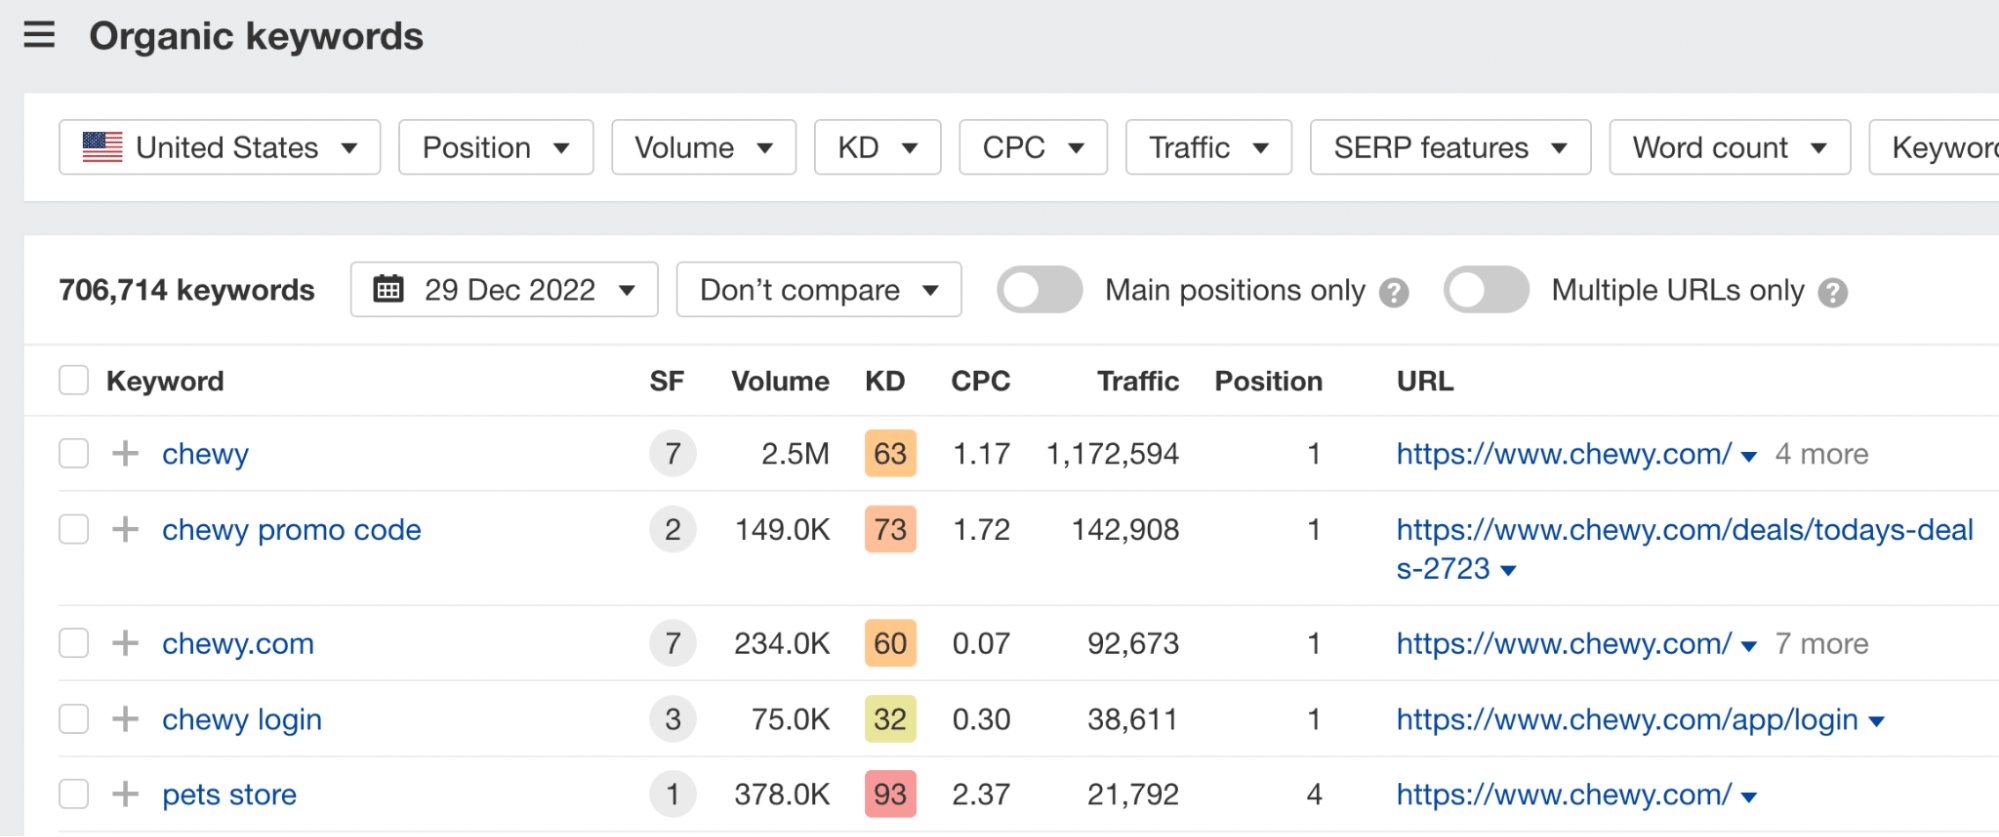
In this example, it has over 700,000 keywords. That’s way too many to sort through. Let’s add some filters to make things easier:
- First, set the KD (Keyword Difficulty) score to a maximum of 30 to find easier-to-rank-for keywords.
- Then we can exclude brand name keywords using the “Keywords” dropdown, set it to “Doesn’t contain,” and type in the brand name.
- If the website has /blog/ in its blog post URLs, you can also set a filter in the “URL” dropdown to “Contains” and type “blog” in the text field. In Chewy’s case, it doesn’t do that, but it does use a subdomain for its blog, which we can search specifically.
When you’re done, it should look like this:

In the case of chewy.com, this only shaved it down to 619,000 keywords. That’s still a lot—let’s filter it down further. We can apply the following:
- Minimum monthly search volume of 100
- Only keywords in positions #1–10
- Only show keywords containing “dog,” since my example website only sells dog food, not all animal food
Here’s what it looks like with these new filters applied:

Now I can find some more related keywords like “what to feed a dog with diarrhea” or “can dogs eat cheese.”

In addition to picking interesting keywords, you can also get an idea of how to become a topical authority on the topic of dog food by searching “dog food” in Ahrefs’ Keywords Explorer.
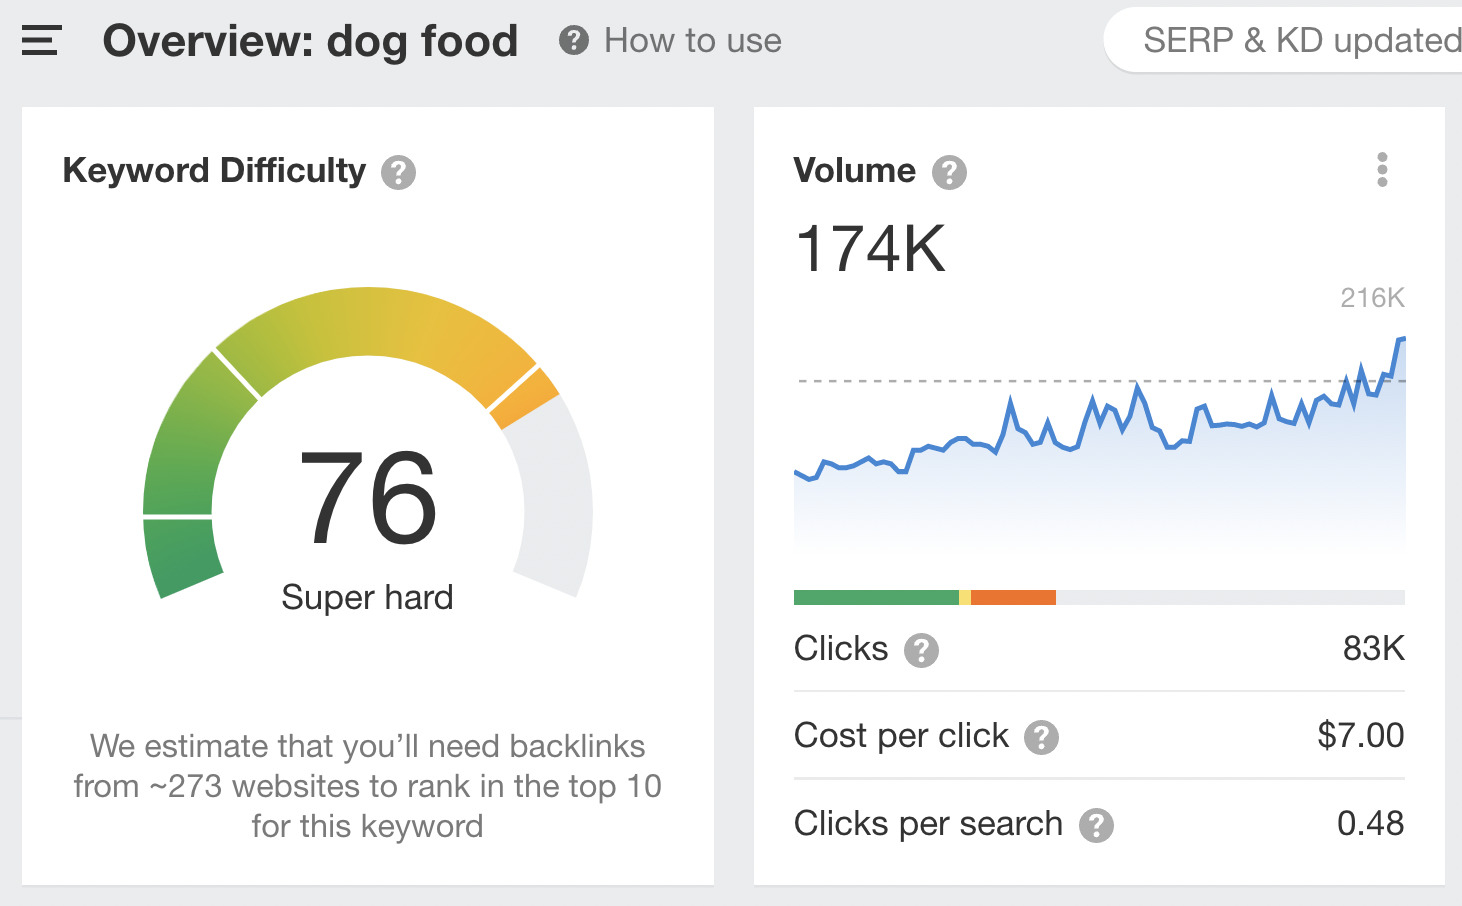
This keyword is extremely difficult to rank on page #1 for. However, if we go to the Related terms report and set the KD to a max of 30, we can see keyword ideas that are still relevant but may be easier to rank high in the search results.
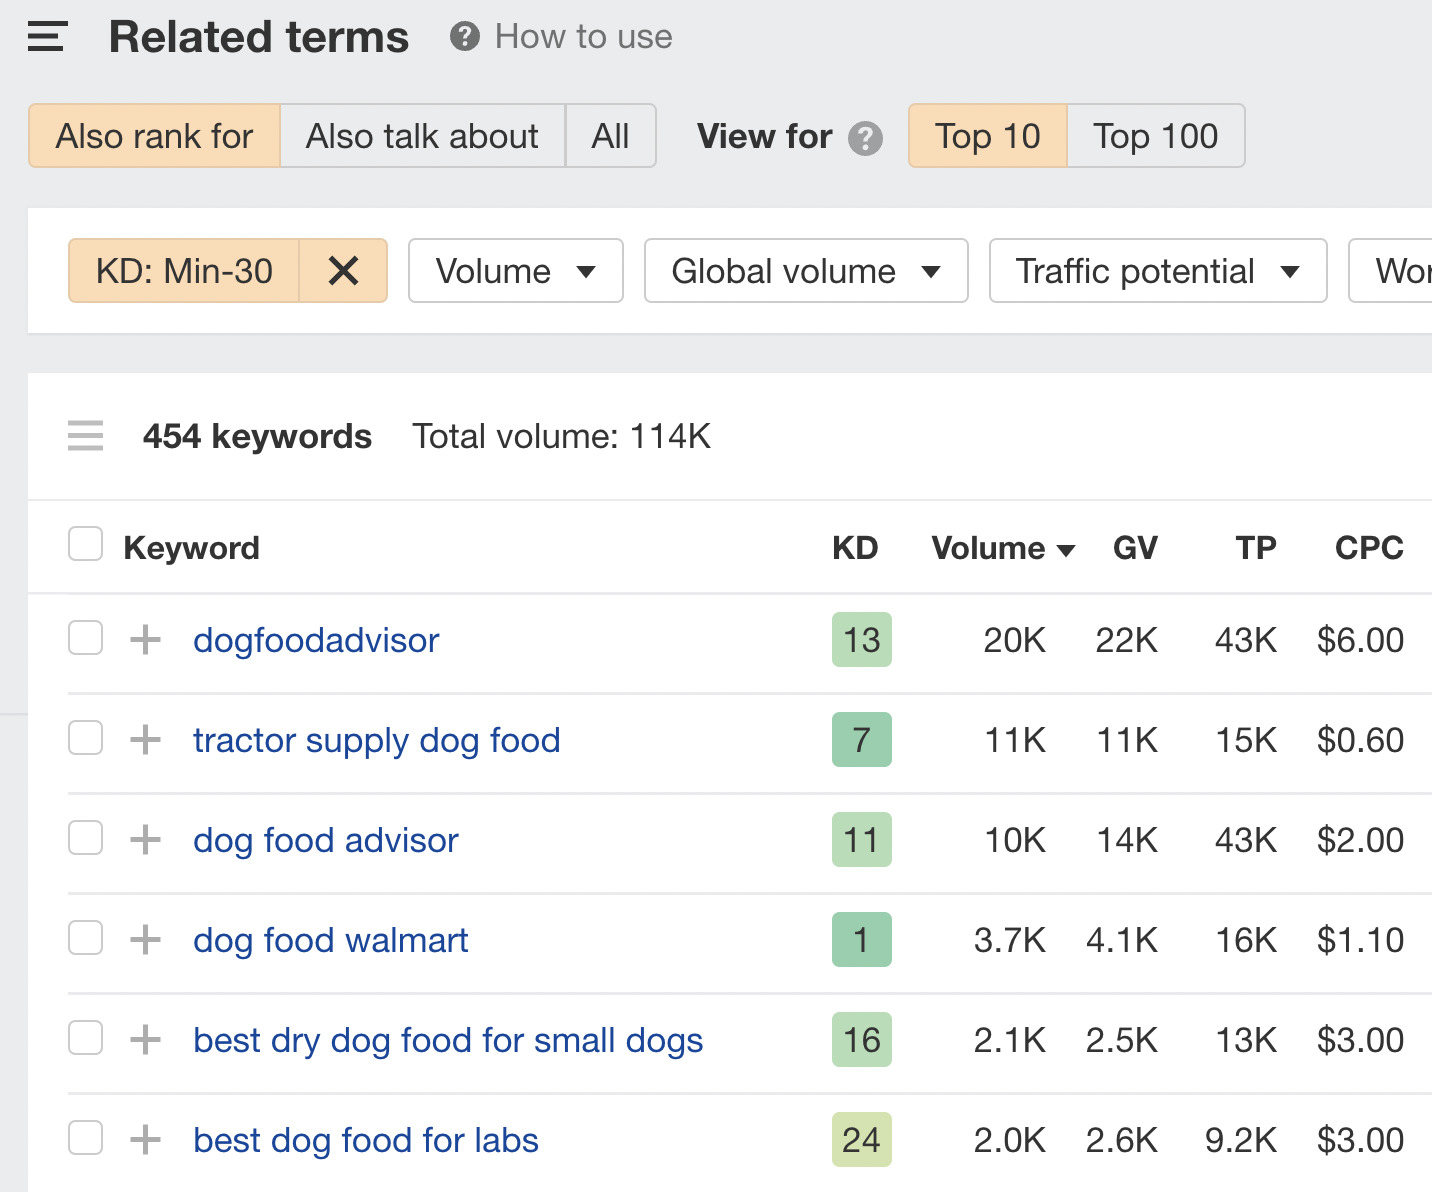
Go through and click the gray + sign next to any keywords you may want to target to add them to your list of potential article ideas.
2. Create templates for future blog posts
One of the first things I do when I create a new blog is to establish a repeatable template that I use for every post. Typically, it looks something like this:
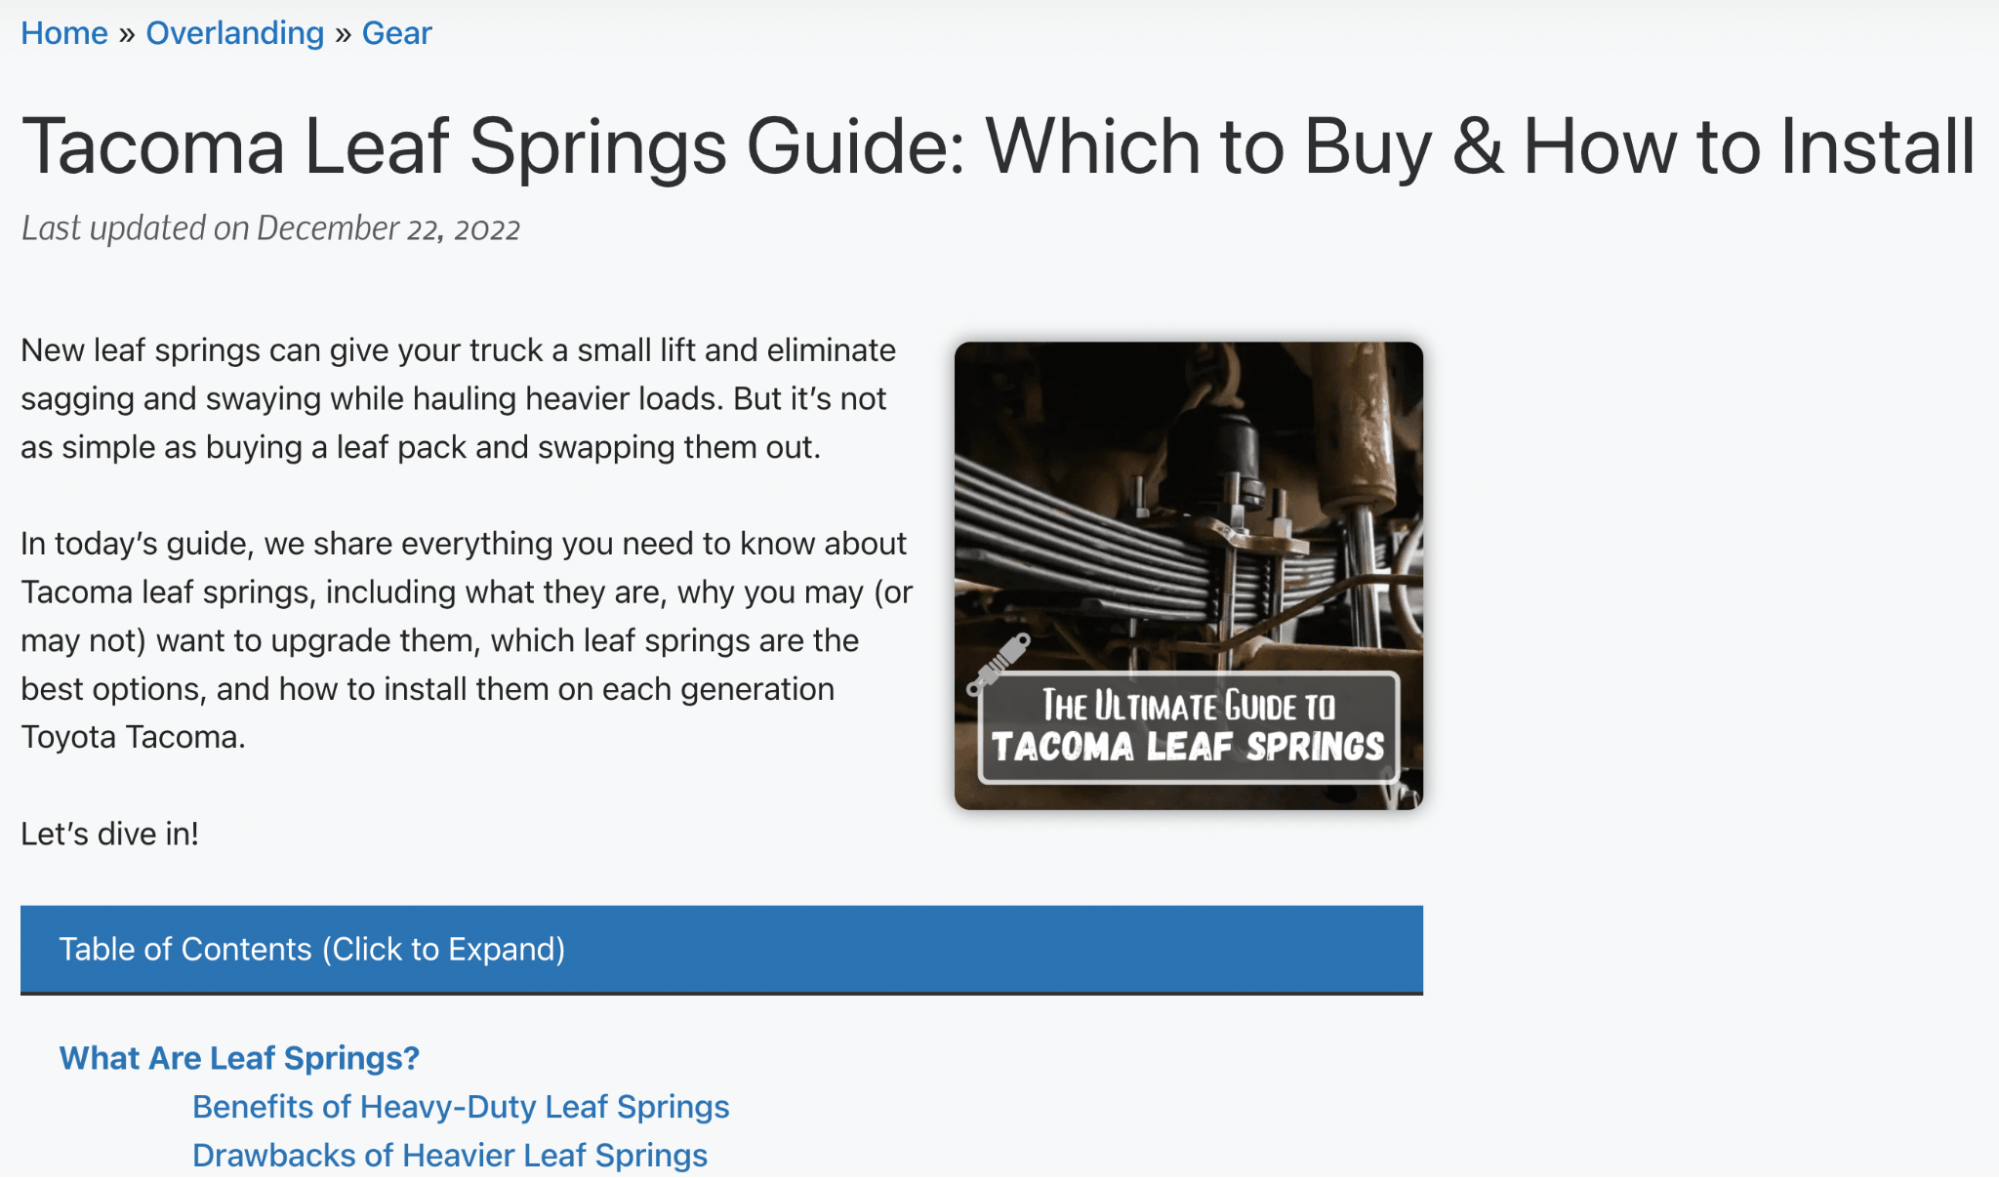
It has breadcrumb navigation to help with SEO and navigation, the article title and the date it was last updated, then a short intro with an image on the right to make the lines shorter (and easier to skim). Finally, I include a clickable table of contents to help with navigation, then get into the article.
Within the article itself, I will use headers (H2s) and subheaders (H3s) to make my content easier to skim and to help Google understand what each section is about.
You can make templates for every kind of post you plan on creating—such as list posts, ultimate guides, tutorials, etc.—and reuse them for every post you ever create. It’s a huge time-saver.
While you’re at it, you should also create a standard operating procedure (SOP) that you go through for every article. This could include writing guidelines, what to do with images, formatting, tone, etc.
3. Outline your article
I never dive into writing an article without outlining it first. An outline ensures the article is well structured and planned before you start writing, and it bakes SEO right into your writing process. It’s another big time-saver.
Typically, you want this outline to include:
- Potential title or titles of the article
- Target keyword
- Brief description of the article angle
- Links to competing articles on Google for research
- Headers and subheaders, with brief descriptions of the section as needed
Here’s a look at part of an example outline I’ll either send to my writers or write myself:
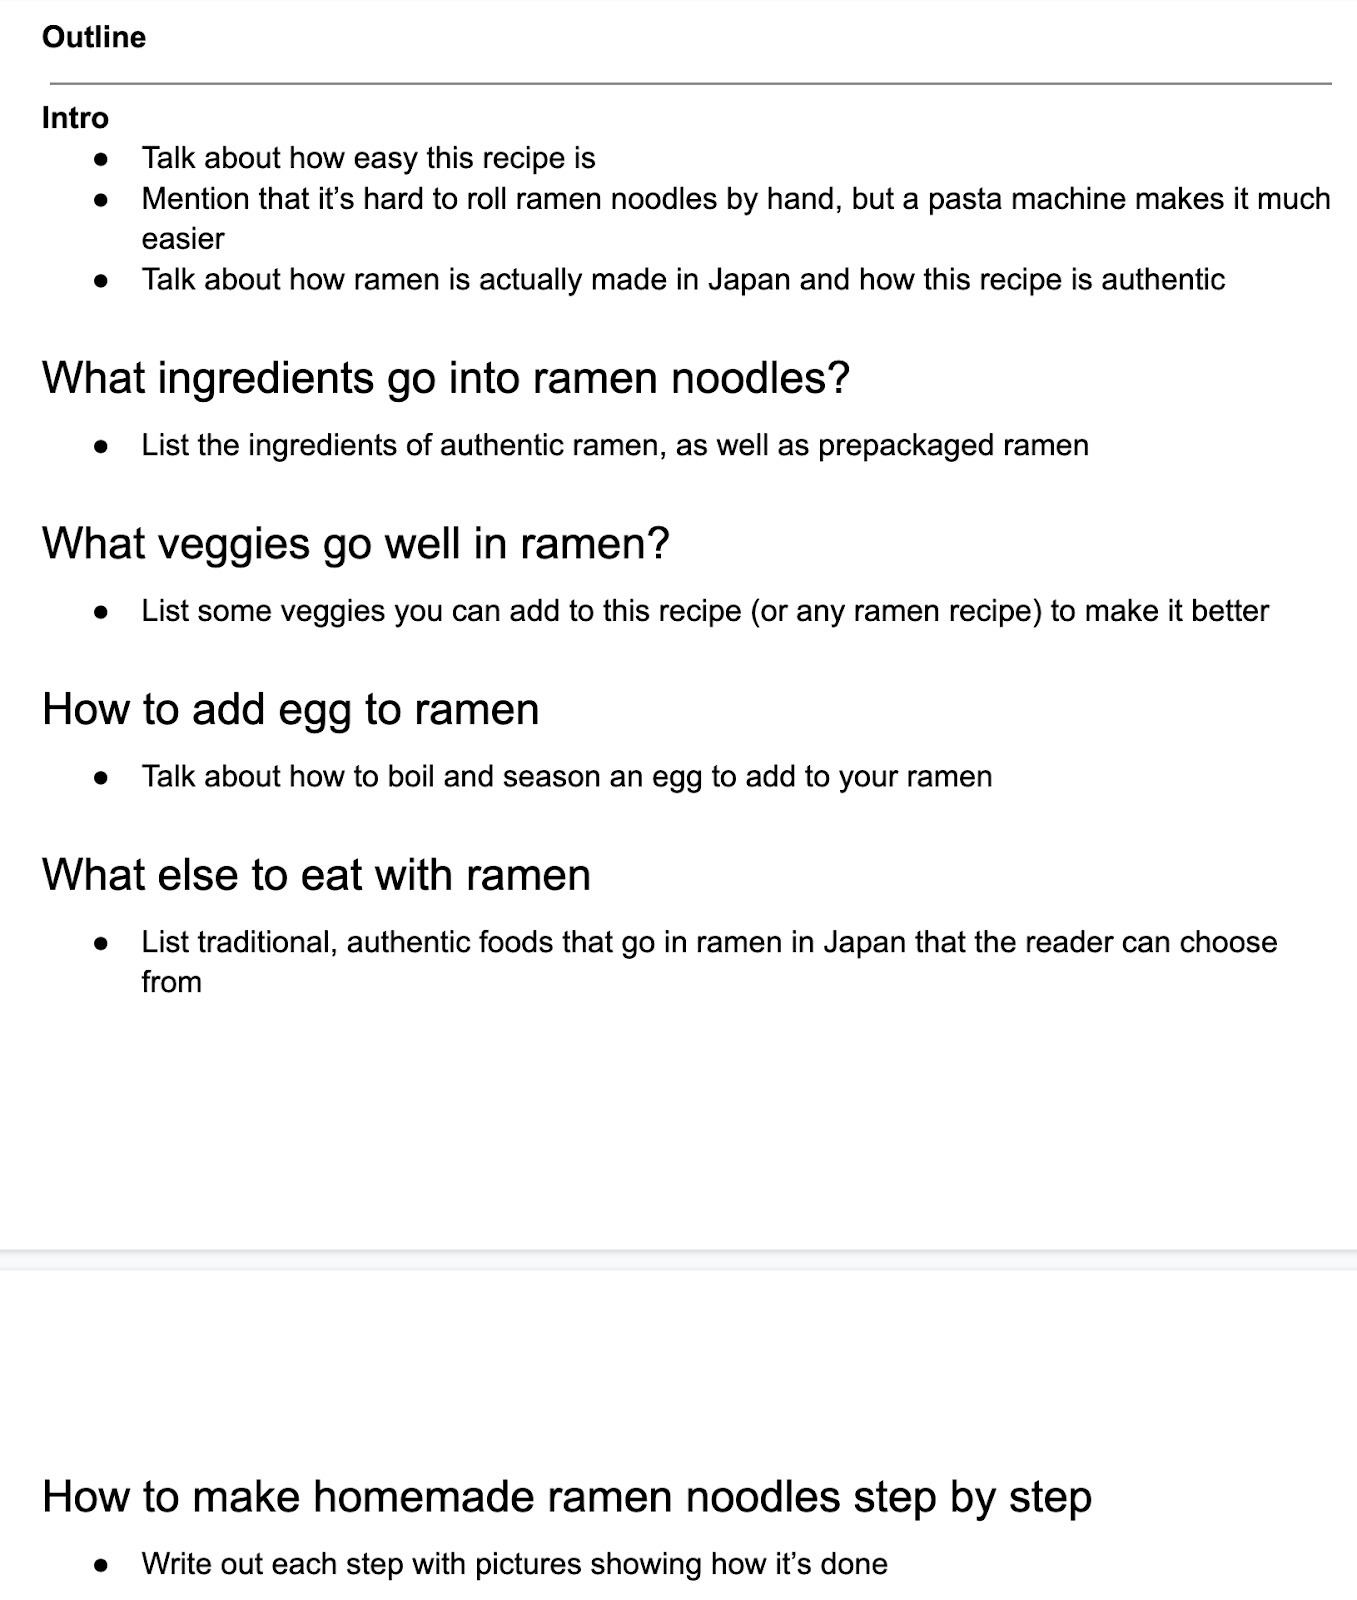
I wrote a guide to outlining content, which you can follow here for the full step-by-step process.
4. Write, optimize, and publish your post
Next up, it’s time to write your article. As you write more articles, you’ll find what works for you—but you may find it easier to fill in the sections then go back and write the intro once the article is finished.
Here are a few writing tips to help you become a better writer:
- Ditch the fluff – If a word isn’t needed to bring a point across, cut it.
- Keep your paragraphs short – Two to three lines per paragraph is plenty, especially for mobile readers where the screen width is shorter.
- Use active voice over passive voice – Here is a guide for that.
- Make your content easy to skim – Include photos and videos and make use of headers and bulleted lists to share key points.
Once you’ve written your article, do some basic on-page SEO to help it rank higher in search results:
- Ensure your article has one H1 tag – The title of the article.
- Have an SEO-friendly URL – Include the keyword you’re targeting, but keep it short and easy to read.
- Link to other pages on your site using proper anchor text – Here’s a guide for that.
- Ensure your images have alt text – This is the text Google uses to read what the image is about, as well as what is shown to readers if the image can’t render.
Finally, publish your post and give yourself a pat on the back.
5. Add product promotions, email opt-ins, and internal links
Before you promote your content, there are a few things you can do to squeeze more ROI from it—namely, you should add a way for people to either push them through the funnel toward purchasing a product or subscribe to your email list. I’ll give an example of each.
First, Solo Stove wrote an article titled “Ambiance Is A Girl’s Best Friend,” where it promotes its tiny Solo Stove Mesa as a way of improving a space’s ambiance:

Beyond directly promoting your products in the articles, you can also add email opt-ins that give people a percentage off their orders. You may lose a little money on the initial order. But once you get someone’s email address, you can promote to them again and get multiple orders from them.
For example, Primary sells kids’ clothing and uses this email pop-up to promote money off its products after you spend a certain amount of time on its website:
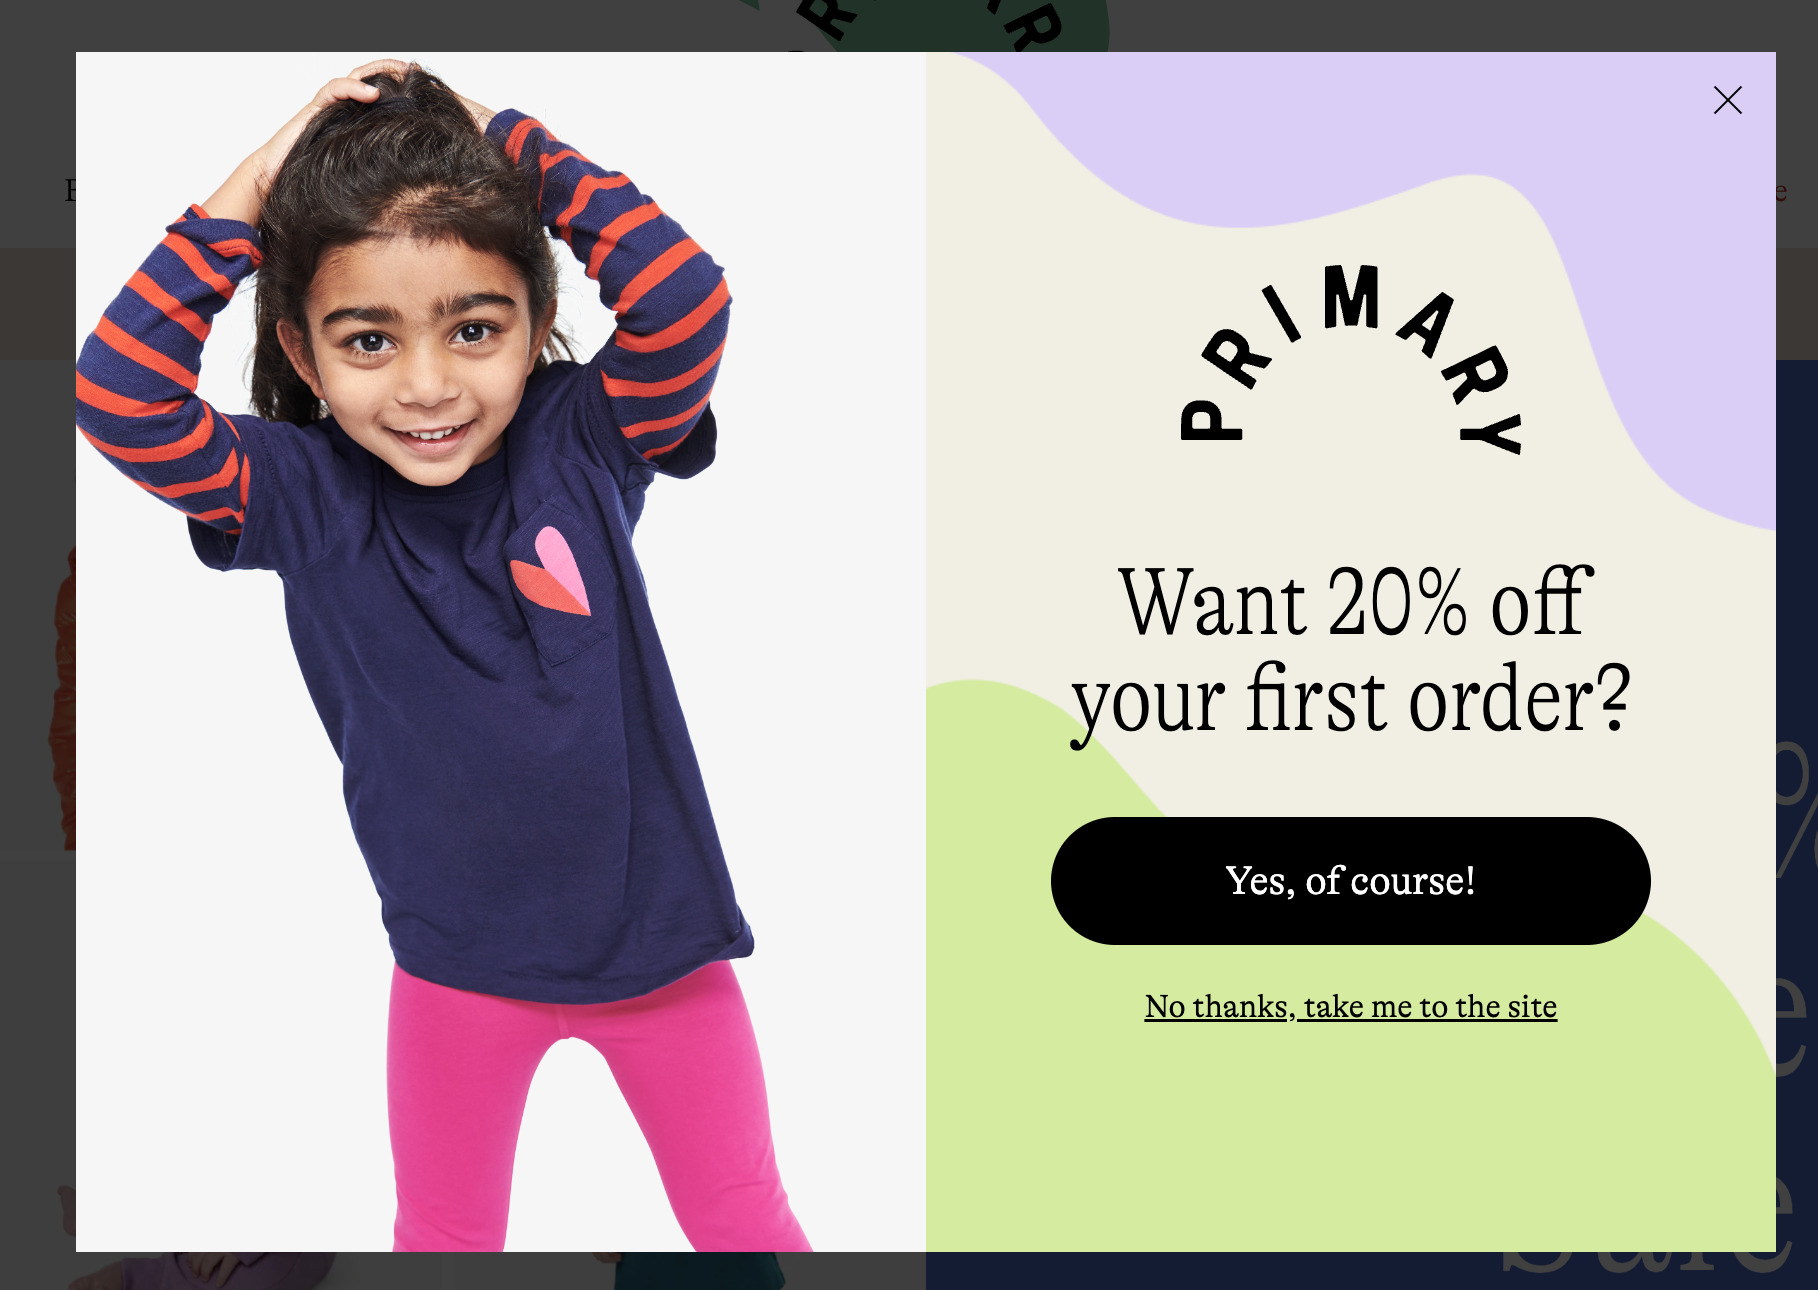
Just make sure your discount code only works once per unique IP address. You can learn more about how to do that here if you use Shopify.
Finally, when you publish an article, you should make it a point to add internal links to your new article from older articles.
This won’t be as important for your first few because you won’t have a ton of articles. But as your blog grows, it’s an important part of the process to ensure your readers (and Google) can still find your articles and that they aren’t buried deep on your site.
Refer to our guide to internal linking to learn more about this step.
6. Promote your content
At this point, your content is live and optimized for both conversions and search engines. Now it’s time to get some eyeballs on it.
We have an entire guide to content promotion you should read, but here are some highlights:
- Share the article on all of your social media channels
- Send the article to your email list if you have one
- Share your content in relevant communities (such as relevant Reddit forums)
- Consider running paid ads to your article
There’s a lot more you can do to promote a piece, including reaching out to other blog owners. But I won’t cover all of that here.
The other important piece of promoting your content is getting other website owners to link to your new articles. This is called link building, and it’s a crucial part of SEO.
There are many ways to build links. Some of the most popular include:
Link building is an entire subject on its own. If you’re serious about blogging and getting search traffic, it’s a crucial skill to learn.
7. Scale your efforts
The final step in blogging for e-commerce is scaling up your efforts by creating repeatable processes for each step and hiring people to do the tasks you yourself don’t need to be doing.
You can hire freelance writers, outreach specialists, editors, and more. You can put together a full SEO team for your business.
If you’re not in a place to start hiring, there are still things you can do to squeeze more output from your time, such as creating the SOPs I mentioned earlier.
Final thoughts
Blogging is one of the best ways to increase your e-commerce store’s traffic and sales. It costs less than traditional paid advertising and can continue to provide a return long after a post has been published.
This guide will hopefully help you start your e-commerce blog and publish your first post. But remember that success with blogging doesn’t happen overnight. In fact, it takes three to six months on average to see any results from your SEO efforts. Keep learning and be patient.
Source: ahrefs.com, originally published on 2023-01-31 23:47:48

![How to Successfully Use Social Media: A Small Business Guide for Beginners [Infographic]](https://b2webstudios.com/storage/2023/02/How-to-Successfully-Use-Social-Media-A-Small-Business-Guide-85x70.jpg)


![How to Successfully Use Social Media: A Small Business Guide for Beginners [Infographic]](https://b2webstudios.com/storage/2023/02/How-to-Successfully-Use-Social-Media-A-Small-Business-Guide-300x169.jpg)


Recent Comments